
Elastic Guide – Install the easy way (Fleet Management)
This guide will walk you through the installation process of elasticsearch & Kibana in combination with the useage of the new Fleet-Management to deploy Elastic Agents. This guide is a reference for myself, but I am happy if it is useful to you, aswell. So let’s start ….
Getting started!
Throughout this guide I will use debian commands, as this is the operating system I use for installation. If you are using a different system, commands may be different.
The first step is to download and install the .deb package provided by elastic.
In the following snippet, you will find the commands to download, install and start elasticsearch.
Download, install & start Elasticsearch
sudo apt install curl
curl –L –O https://artifacts.elastic.co/downloads/elasticsearch/elasticsearch–7.15.2–amd64.deb
sudo dpkg –i elasticsearch–7.15.2–amd64.deb
sudo systemctl daemon-reload
sudo systemctl enable elasticsearch.service
sudo systemctl start elasticsearch.service
Elastricsearch should now be running on your machine.
Let’s check if the daemon runs:

As you can see, elastic runs. If you see active: failed in red, something went wrong and you need to troubleshoot your installation.
The next step will be the graphical interface for our Elasticsearch. There are multiple Tools outside, which could be used. As I like Kibana the most I will go with it. Kibana is an open source analytics and visualization platform designed to work with elasticsearch.
It is recommended to install Kibana on the same host as elasticsearch.
Download, install & start Kibana
sudo apt install nginx
sudo cp /etc/nginx/sites-available/default /etc/nginx/sites-available/domain.com
sudo nano /etc/nginx/sites-available/domain.com
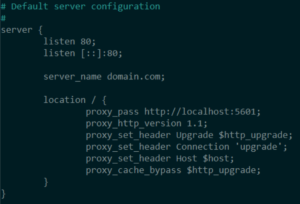
sudo ln -s /etc/nginx/sites-available/domain.com /etc/nginx/sites-enabled/domain.com
sudo systemctl restart nginx
curl -L -O https://artifacts.elastic.co/downloads/kibana/kibana-7.15.2-linux-x86_64.tar.gz
tar -xzvf kibana-7.15.2-linux-x86_64.tar.gz
cd kibana-7.15.2-linux-x86_64/
./bin/kibana
After Kibana has started with the info „Kibana is now available“, you can open your browser and enter the domain, where you installed it. (In this example it is domain.com)
If you browse to „http://domain.com/status“, Kibana shows you it’s ressource usage, aswell as the loaded plugins.

Configure Kibana!
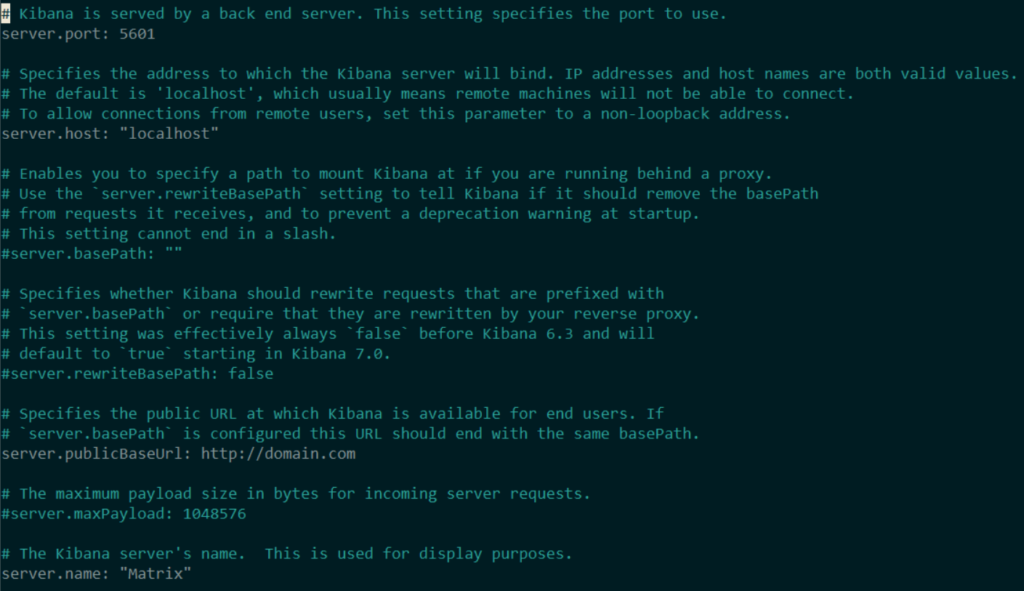
Maybe you already noticed, but Kibana is telling you to configure the „server.publicBaseUrl“ property. So let’s configure this.
You will find the config file in the previous downloaded & extracted tar directory. In my case it is: ~/kibana-7.15.2-linux-x86_64/config/kibana.yml
Configure kibana.yml
nano ~/kibana-7.15.2-linux-x86_64/config/kibana.yml
cd ~/kibana-7.15.2-linux-x86_64
./bin/kibana
Now Kibana and Elastic is setup. But it is not wanted to always start kibana by ourself, so let’s setup a daemon, like the one we have for elasticsearch.
Kibana Daemon
sudo mv kibana-7.15.2-linux-x86_64/ /opt/
cd /etc/systemd/system
sudo nano kibana.service
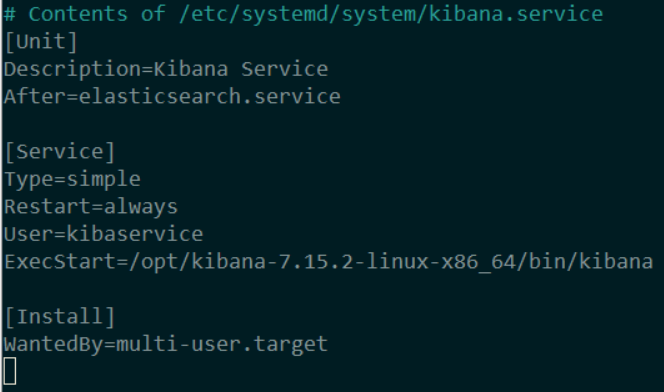
sudo systemctl daemon-reload
sudo systemctl enable kibana.service
sudo systemctl start kibana.service
Please note, that we need to add the user „kibaservice“ at the system before we start the service. Otherwise the start would fail.
Now that we finally setup Elastic & Kibana let’s go to the Fleetmanagement to finally start receiving logs.
Configure Fleet!
Let’s check out the Fleet Menu in Kibana. Press the Burger-Button in the upper left corner to slide out the Navigation-Menu. At the Management category, you will find the Fleet. Unfortunately we can’t access it, yet as it wants some superuser privileges.
But Wait!
We don’t even login, we have no usermanagement at all.
Don’t worry, your right, we need to set it up, right now. If you ask yourself about licensing, the basic security features can be used with the free version.
Enable Elasticsearch security features
sudo systemctl stop kibana.service
sudo systemctl stop elasticsearch.service
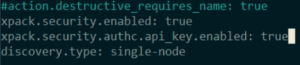
sudo nano /etc/elasticsearch/elasticsearch.yml
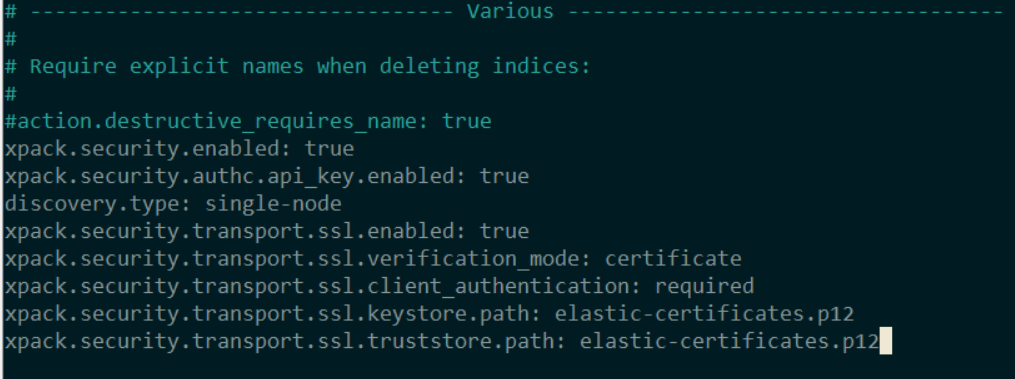
add the following to the end of elasticsearch.yml:
![]()
sudo systemctl start elasticsearch.service
sudo su –
cd /usr/share/elasticsearch/bin/
./elasticsearch-setup-passwords auto

exit
Note: Save the passwords generated. You will need them later to add your user.
Connect Kibana to Elastic with a password
sudo nano /opt/kibana-7.15.2-linux-x86_64/config/kibana.yml
Uncomment the following line (remove starting #):
elasticsearch.username: „kibana_system“
Close Nano with Ctrl+O to save it.
cd /opt/kibana-7.15.2-linux-x86_64
./bin/kibana-keystore create
./bin/kibana-keystore add elasticsearch.password
sudo systemctl start kibana.service
We are finished with the minimal security configuration of Kibana & Elastic. Now we will go back to the browser. After you refreshed the page, you will now see, that Kibana is asking for a Login.

To login to the newly secured Elastic, we use the password of the „elastic“-user we created in the last steps.
Again go to the Burger-Menu -> Management -> Stack Management and on the new loading page go to Security -> Users.
Create a new user and assign it the „superuser“-role. This user will be your Administration user.
Logout & Login again with the newly created user.
Now, as you are logged in with your superuser, we can go back to the Fleet page.
As you see, we are no longer prompted permission issues, but elastic also needs api key service enabled to be able to create a Fleet of Elastic Agents.
So let’s do it!

Configure API key service for Fleet Management
sudo nano /etc/elasticsearch/elasticsearch.yml
sudo systemctl stop kibana.service
sudo systemctl stop elasticsearch.service
sudo systemctl start elasticsearch.service
sudo systemctl start kibana.service
After we have configured elasticsearch.yml to enable the API key service and restarted our Kibana & Elastic service, we can go back to the Browser and refresh the page for Fleet Management.
Before we setup the Fleet Server we need to secure Elastic a little more.
That’s why the next step is adding TLS to our Elastic.
Configure TLS
sudo su –
cd /usr/share/elasticsearch/
./bin/elasticsearch-certutil ca
Accept defaults when prompted and give it a password
./bin/elasticsearch-certutil cert –ca elastic-stack-ca.p12
Enter ca password and accept defaults when prompted and give it a password
cp elastic-certificates.p12 /etc/elasticsearch/
cd /etc/elasticsearch/
nano elasticsearch.yml
Specify the following variables:
cluster.name: <your cluster name>
node.name: <your node name>
Add the following xpack features to the file:
xpack.security.transport.ssl.enabled: true
xpack.security.transport.ssl.verification_mode: certificate
xpack.security.transport.ssl.client_authentication: required
xpack.security.transport.ssl.keystore.path: elastic-certificates.p12
xpack.security.transport.ssl.truststore.path: elastic-certificates.p12
Save the file with Ctrl+O
cd /usr/share/elasticsearch/
./bin/elasticsearch-keystore add xpack.security.transport.ssl.keystore.secure_password
./bin/elasticsearch-keystore add xpack.security.transport.ssl.truststore.secure_password
systemctl stop kibana.service
systemctl stop elasticsearch.service
cd /etc/elasticsearch/
chmod 640 elastic-certificates.p12
systemctl start elasticsearch.service
exit
sudo systemctl start kibana.service
Configure Client communcation encryption
sudo systemctl stop kibana.service
sudo systemctl stop elasticsearch.service
sudo su –
cd /usr/share/elasticsearch/
./bin/elasticsearch-certutil http
Answer the questions carefully. We do not want a CSR but we do want a CA. Path to CA is the previous created elastic-stack-ca.p12 as full path.
apt install unzip
mkdir client-cert
mv elasticsearch-ssl-http.zip client-cert/
cd client-cert
unzip elasticsearch-ssl-http.zip
cp elasticsearch/http.p12 /etc/elasticsearch/
nano /etc/elasticsearch/elasticsearch.yml
Add the following two xpacks:
xpack.security.http.ssl.enabled: true
xpack.security.http.ssl.keystore.path: http.p12
Save the file
./bin/elasticsearch-keystore add xpack.security.http.ssl.keystore.secure_password
systemctl start elasticsearch.service
cp /usr/share/elasticsearch/client-cert/kibana/elasticsearch-ca.pem /opt/kibana-7.15.2-linux-x86_64/config/
exit
cd /opt/kibana-7.15.2-linux-x86_64/
nano config/kibana.yml
Change the following lines:
elasticsearch.ssl.certificateAuthorities: [ „/opt/kibana-7.15.2-linux-x86_64/config/elasticsearch-ca.pem“ ]
elasticsearch.hosts: [„https://domain.com:9200“]
Save the file
sudo systemctl start kibana.service
Configure Kibana Browser Certificate
sudo systemctl stop kibana.service
Create a signed certificate of your network CA and use it or create one like the following:
sudo su –
cd /usr/share/elasticsearch
./bin/elasticsearch-certutil csr -name kibana-server -dns domain.com,www.domain.com
unzip csr-bundle.zip
cd kibana-server/
Sign the CSR file with your internal/trusted CA for signing or self-sign it
openssl x509 -req -in kibana-server.csr -CA rootCA.crt -CAkey rootCA.key -CAcreateserial -out kibana-server.crt -days 1825 -sha256
exit
cd /opt/kibana-7.15.2-linux-x86_64/config
cp ~/kibana-server.crt /opt/kibana-7.15.2-linux-x86_64/config/
sudo systemctl start kibana.service
cd /etc/nginx/sites-available/
sudo nano domain.com
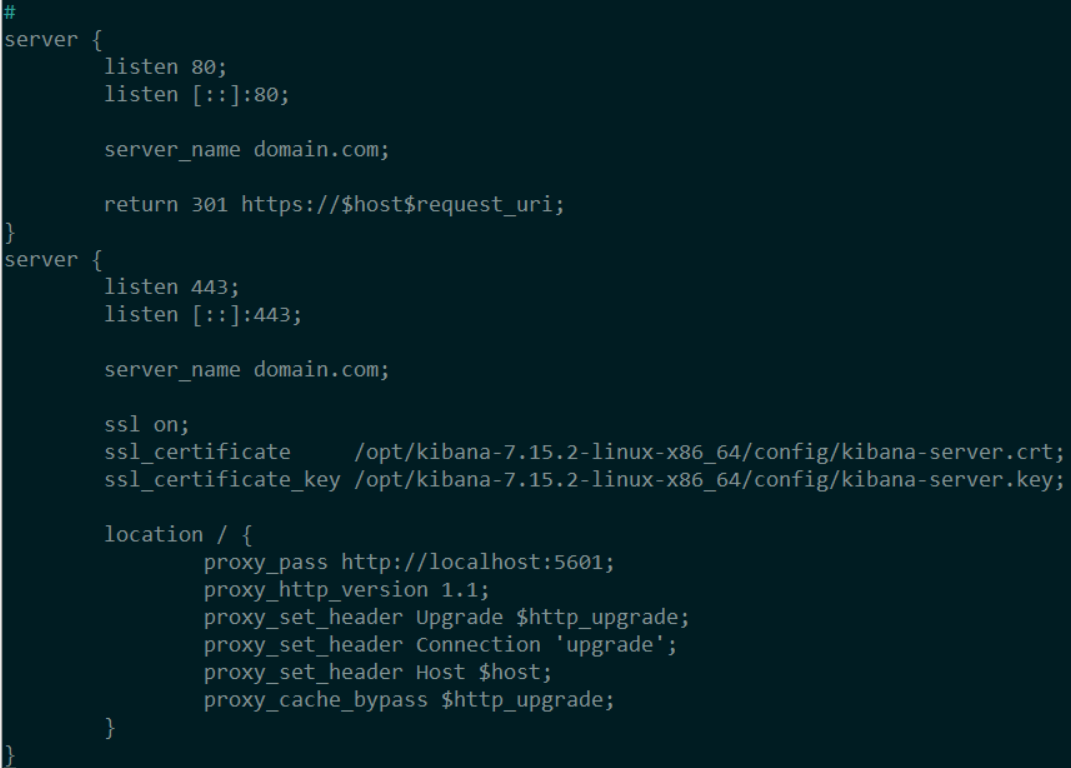
sudo systemctl restart nginx
Setup the Fleet Server
curl -L -O https://artifacts.elastic.co/downloads/beats/elastic-agent/elastic-agent-7.15.2-linux-x86_64.tar.gz
sudo systemctl stop kibana.service
sudo systemctl stop elasticsearch.service
sudo nano /etc/elasticsearch/elasticsearch.yml

Note: If you want to add Hosts from the network you can add those in the discovery field as an allow-list. If you just want to allow everything connecting change network.host: domain.com to 0.0.0.0
sudo systemctl start elasticsearch.service
cd /opt/kibana-7.15.2-linux-x86_64/
nano config/kibana.yml
change elasticsearch.hosts address to your elasticsearch https://host:9200
sudo systemctl start kibana.service
Next part is in the Browser on Fleet Page
In the upper right -> Fleet settings -> Add Fleet Server hosts & change Elasticsearch hosts
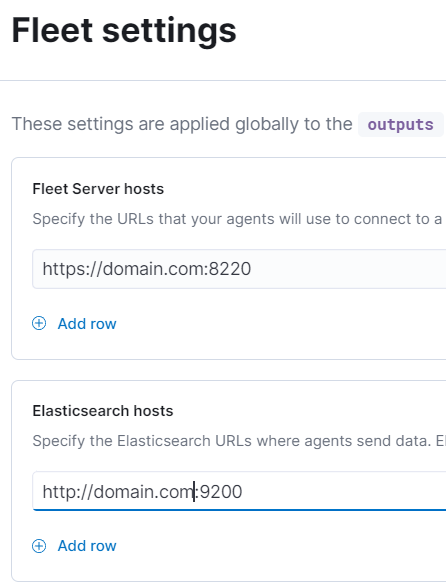
Note: Elasticsearch hosts needs to be https:// instead of http://
Save & Apply changes
Fleet -> Agents -> Generate Service Token
(If this is greyed out, add a random Fleet Server and remove it from Fleet settings)
Save the Service Token to a Password Manager.
Copy the generated command
Connect the Fleet Server with Elastic
tar -xzvf elastic-agent-7.15.2-linux-x86_64.tar.gz
sudo mv elastic-agent-7.15.2-linux-x86_64/ /opt/
cd /usr/share/elasticsearch/
./bin/elasticsearch-certutil ca –pem
I named the file elastic-fleet-ca.zip
unzip elastic-fleet-ca.zip
./bin/elasticsearch-certutil cert –name fleet-server –ca-cert ca/ca.crt –ca-key ca/ca.key –dns domain.com –ip 192.168.150.15 –pem
unzip certificate-bundle.zip
cd fleet-server/
cp fleet-server.* /opt/elastic-agent-7.15.2-linux-x86_64/
cd /opt/elastic-agent-7.15.2-linux-x86_64
cp /usr/share/elasticsearch/ca/ca.crt /opt/elastic-agent-7.15.2-linux-x86_64/
cp /usr/share/elasticsearch/client-cert/kibana/elasticsearch-ca.pem /opt/elastic-agent-7.15.2-linux-x86_64/
exit
Sample Fleet-Server connect:
sudo ./elastic-agent install –url=https://domain.com:8220 -f –fleet-server-es=https://domain.com:9200
–fleet-server-service-token=<your_token> –fleet-server-policy=<your_policy> –certificate-authorities=/opt/elastic-agent-7.15.2-linux-x86_64/ca.crt
–fleet-server-es-ca=/opt/elastic-agent-7.15.2-linux-x86_64/elasticsearch-ca.pem –fleet-server-cert=/opt/elastic-agent-7.15.2-linux-x86_64/fleet-server.crt
–fleet-server-cert-key=/opt/elastic-agent-7.15.2-linux-x86_64/fleet-server.key

Congratulations!
You successfully installed Elasticsearch & Kibana with the ability to enroll Elastic Agents.

Your Agents Page should now look like the following:

Thanks for reading through this.
It took some time to setup everything and document on the side but I think it was worth it.
I now have an easy to manage SIEM with a simple way to collect logs through Elastic Agents.
Maybe I will write more in the future.
Stay save!
P.S.: If you do not receive logs from your Elastic Agent you probably forgot to add the newly created CA to the trusted root CA on your machine.